# Simplify State Management with React.js Context API Tutorial
> Learn how to manage React state efficiently using the Context API, avoiding prop drilling and enhancing code maintainability.
- **Source:** DevDreaming (https://devdreaming.com)
- **Canonical URL:** https://devdreaming.com/blogs/simplify-state-management-with-reactjs-context-api
- **Author:** CodeBucks
- **Published:** 2024-07-30
- **Topics:** Web Development, React js
---
Hi there👋🏻,
This article is specifically created for beginners who are eager to learn more effective methods for managing state between multiple components. It also aims to address the common issue of prop drilling, which can make your code harder to maintain and understand. Let's start with what kind of problem does context API solves.
If you prefer the video format then here is the tutorial that you can watch on my youtube channel.👇🏻
[▶ Watch the video on YouTube](https://www.youtube.com/watch?v=4p_VWn1AEvg)
### What is Prop Drilling?
You know how sometimes you need to pass data from a parent component down to a child component, and you end up passing props through a bunch of components in between? That's called **prop drilling**, and it can get messy fast. Let's walk through an example to clarify this.

As given in the diagram, Imagine you've fetched some data in the `App` component, which sits at the root of your application. Now, if a deeply nested component, say the `Grandchild` component, needs to access this data, you'd typically pass it down through the `Parent` and `Child` components as props before it reaches `Grandchild`. This can get ugly as your app grows.
Here is another visual representation:

In the above example, the `Profile` component needs user data, but this data has to travel through the `App` and `Navigation` components first, even though these intermediate components don't use the data themselves. So, how do we clean this up? That's where the Context API comes in handy.
Props drilling:
- Increases re-rendering of components
- Increases boilerplate code
- Creates component dependency
- Decreases performance
### React context API
Context API in React.js lets you pass data between components without needing to pass it as props through each level of the component tree. It works like a global state management system where you define your state in a context object, and then you can easily access it anywhere in the component tree. Let's understand this with an example.
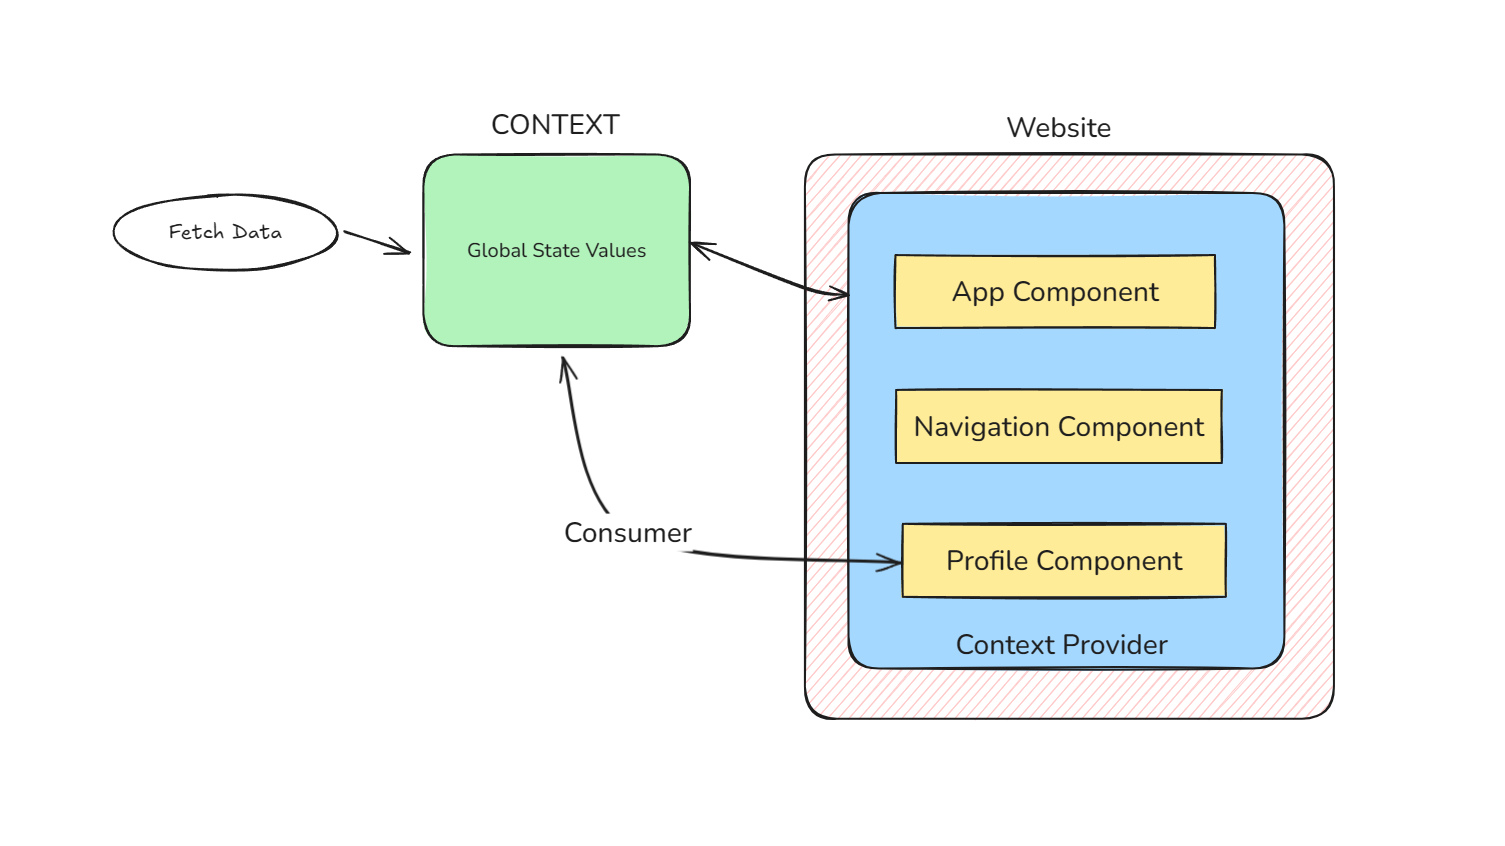
As you can see in the diagram, we have a context object that stores data to be accessed by multiple components. This data is fetched from APIs or third-party services. Before accessing this context data in any component, we need to wrap all the components that require this data in a context provider component. If we only need to access data in the navigation and profile components, we don't need to wrap the app component. Once you've wrapped the relevant components with the `ContextProvider`, you can directly access the context data in any component that consumes it. Don't worry if you still don't understand it yet; let's dive into the code and see it in action.
### How to use Context API?
First let's create a React app using [Vite.js](https://vitejs.dev/guide/). Just copy the following commands to setup the project.
```powershell
npm create vite@latest
```
- Add your project name
- Select React
- Select typescript from options
```powershell
cd project_name // to change to project directory
npm install
npm run dev
```
Then you can open your development server `http://localhost:5173` in your browser.
First let's create required folders. Here is our project's folder structure.
```markdown
src
| components
| context
```
In the components folder let's create `Profile.jsx` file and add the following code.
```javascript
import React from 'react'
const Profile = () => {
return (
Profile
)
}
export default Profile
```
Create one more component called `Navbar.jsx` in components folder.
```javascript
import Profile from './Profile'
const Navbar = () => {
return (
)
}
export default Navbar
```
Let's import this `` component in the `App.jsx` file.
```javascript
import Navbar from "./components/Navbar";
function App() {
return (
);
}
export default App;
```
So basically `` component is child of `` and `` is child of `` component.
#### Adding Context API
Let's create `UserContext.jsx` file in the `context` folder. Add the following code in the file.
```javascript
import { createContext, useEffect, useState } from "react";
export const UserContext = createContext();
export const UserProvider = ({ children }) => {
const [user, setUser] = useState(null);
const fetchUserData = async (id) => {
const response = await fetch(
`https://jsonplaceholder.typicode.com/users/${id}`
).then((response) => response.json());
console.log(response);
setUser(response);
};
useEffect(() => {
fetchUserData(1);
}, []);
return (
{children}
);
};
```
- First, we create an empty `UserContext` object using `createContext`. We make sure to import it from `react`. We can add default values inside the context object, but we keep it null for now.
- Next, we create `UserProvider`, which returns a provider using `UserContext`, like `UserContext.Provider`. It wraps around the children components, and in the value, we can pass anything we want to use in the child components.
- Right now we are using [jsonplaceholder API](https://jsonplaceholder.typicode.com/) to fetch the user data. The [jsonplaceholder](https://jsonplaceholder.typicode.com/) provides fake API endpoints for testing purposes. The `fetchUserData` function accepts `id` and use that id to fetch the user data. Then we are storing the response in the `user` state.
- We are calling `fetchUserData` function in the `useEffect` so on page load it calls the function and it injects the data in `user` state.
Now let's use this context in the `` component. Wrap the `` component using the `` same as the following code:
```javascript
```
Let's use the `user` state in `` component. For that we will use `useContext` hook. That takes `UserContext` and provides the values that we have passed in the `UserProvider` such as `user` state and `fetchUserData` function. Remember we don't need to wrap `` component since it is already in the `` component which is already wrapped with provider.
Open the `Profile.jsx` and add the following code.
```javascript
const { user } = useContext(UserContext);
if (user) {
return (
{user.name}
);
} else {
return Login;
}
```
Here, we are using `user` state from the `UserContext`. We will display username if there is `user` otherwise we will display just a login message. Now if you see the output there should be a user name in the navbar component. This is how we can directly use any state that is in the context in any components. The component that uses this state should be wrapped within ``.
You can also use multiple context as well. You just need to wrap the provider components within another provider component as shown in the following example.
```javascript
```
In the above example we are using `` which manages the theme state.
> You can watch the above youtube video to see the full example of using multiple context providers.
### Optimizing Re-render in React Context API
There is one problem that occurs when you use the Context API in multiple components. Whenever the state or value changes in the Context API, it re-renders all the components subscribed to that particular context, even if not all the components are using the changed state. To understand this re-rendering issue, let's create a `` component that uses context to store and display count values. Check out the following example. You can create a `Counter.jsx` file in the components folder and paste the following code.
```javascript
import { createContext, memo, useContext, useState } from "react";
const CountContext = createContext();
const CountProvider = ({ children }) => {
const [count, setCount] = useState(0);
return (
{children}
);
};
function CountTitle() {
console.log("This is Count Title component");
return
Counter Title
;
}
function CountDisplay() {
console.log("This is CountDisplay component");
const { count } = useContext(CountContext);
return
Count: {count}
;
}
function CounterButton() {
console.log("This is CounterButton component");
const { count, setCount } = useContext(CountContext);
return (
<>
);
}
export default function Counter() {
return (
);
}
```
In the above code:
- First we create one `CountContext` object using `createContext`
- In the `CountProvider` we have one state to store count values. We are sending `count` and the `setCount` method to the child components through value prop.
- We have created components separately to see how many times individual components re-render.
- ``: This component displays only the title and is not even using any values from the context.
- ``: This component displays count values and is using `count` state from the context.
- ``: This component renders both the above component and a button that increases the count values using `setCount`.
- At the end we are wrapping the `` component within the `CountProvider` component so that the other components can access the count values.
Now if you run the code and click the `Increase` button you'll see in the logs that every component is re-rendering each time the state changes. The `` is not even using count values yet it is re-rendering. This is happening because the parent component of `` which is `` is using and updating the value of count and that's why is re-rendering.
How can we optimize this behavior? The answer is [`memo`](https://react.dev/reference/react/memo). The React `memo` lets you skip re-rendering a component when its props are unchanged. After the `` component let's add the following line.
```javascript
const MemoizedCountTitle = React.memo(CountTitle)
```
Now in the `` component where we are rendering the `` component replace the `` with `` as in the following code:
```javascript
<>
```
Now if you increase the count and check the logs you should be able to see that it is not rendering the `` component anymore.
### Redux vs Context API
The `Redux` is A state management library for complex state management with more predictable state transitions. While the Context API is designed for simple state management and passing data through the component tree without prop drilling. So when to choose which?
- Use **React Context API** for simple, localized state management where the state is not frequently changing.
- Use **Redux** for complex state management needs, especially in larger applications where the benefits of its structured state management outweigh the extra setup.
There is also one more library that is also a popular option for state management. The [React Recoil](https://recoiljs.org/).
- The **React Recoil** is a state management library for React that aims to provide the simplicity of Context API with the power and performance of Redux.
If you're interested in learning more about **React Recoil**, let me know in the comments and I'll create in-depth tutorials on these topic based on your feedback.
### Conclusion
The `React.js` Context API offers a powerful and efficient way to manage state across multiple components, effectively addressing the issue of prop drilling. By using the Context API, you can simplify your code, reduce unnecessary re-renders, and improve overall application performance. While the Context API is ideal for simple state management, more complex applications may benefit from using `Redux` or other state management libraries like `React Recoil`. Understanding when and how to use these tools will enable you to build more maintainable and scalable React applications.
Thanks for reading this article, I hope you found it helpful. If you are interested in learning and building project using React, Redux and Next.js you can visit my YouTube channel here: [CodeBucks](https://www.youtube.com/channel/UCeYt6blRBKuNrEg_-282fSA/)
---
## Related on DevDreaming
- [All Blog Posts](https://devdreaming.com/blogs)
- [Free Developer Tools](https://devdreaming.com/tools)
- [Video Tutorials](https://devdreaming.com/videos)
- [AI Tools for Developers](https://devdreaming.com/ai-tools)
---
_This is the Markdown twin of a page on **DevDreaming** -- free developer tutorials, tools, and AI resources. Source of truth: the canonical HTML URL above._